Externally Hosted Video

Embed a YouTube, Vimeo, or Kaltura video

This is an example of a Kaltura Video.

Description of the video:

[music] In this video, we’ll go over the basics of scheduling meetings held in Microsoft Teams. A meeting scheduled through Microsoft Teams can happen in a virtual location, a physical location, or both. Meetings scheduled using the Microsoft Teams app are automatically given a virtual Teams meeting room, but you have the option to add a physical location to facilitate hybrid meetings, or you can choose to ignore the virtual location entirely and only meet in a physical room. In this video, I’ll discuss scheduling three different types of meetings: channel meetings, standard meetings, and ad-hoc meetings. For each type of meeting, I’ll introduce the meeting type, talk about pros and cons for that specific type of meeting, then show you how to schedule it. As a quick heads-up, your Microsoft Teams interface may look different than what’s being presented here, and some features may not be available yet in your version of Microsoft Teams. Let’s start with channel meetings. As you may have guessed by the name, channel meetings are scheduled through a channel that’s part of a team in Microsoft Teams. There are many reasons why you might want to schedule a channel meeting in Microsoft Teams. First, let’s talk about the benefits of channel meetings. Channel meetings are open to anyone on the team, which means everyone who’s a member can join the meeting. The chat from a channel meeting is persistent and is available in the channel’s Posts tab after the meeting is over so you can continue any conversations started in the meeting. Channel meetings can be scheduled by any member of the team the channel is a part of. Any files shared in the meeting are also stored in the channel’s Files tab, making them accessible to everyone in the team. If you record a meeting, the recording will also be saved in the channel’s files. When scheduling a channel meeting, you can choose to invite required and optional attendees, as well as send personal invites to all team members so the channel meeting displays on their Outlook calendars. While channel meetings have many benefits, they do have a few drawbacks as well. Channel meetings can’t be scheduled through Outlook, which means you can’t have a delegate schedule a channel meeting for you. Additionally, the option to schedule a channel meeting is not available for private channels – however, private channels can start an ad-hoc meeting using the Meet Now option. Let’s learn how to schedule a channel meeting. There are a few different places we can start the process: either from the channel we want to schedule the meeting in, or from the calendar in Microsoft Teams. To start scheduling through a channel, first, navigate to the channel you want to schedule a meeting in. Once in the channel, in the upper right corner of the window, look for the Meet button – it looks like a video camera. From here, click the drop-down button to the right of the Meet button, and in the menu that appears, click on Schedule a meeting. The "New meeting" window will appear. To start scheduling using the calendar, in the Calendar app in Microsoft Teams, look for the New Meeting button in the upper right corner of the screen. From here, click the drop-down button to the right of the New Meeting button, and in the menu that appears, click Schedule meeting. The "New meeting" window will appear. From here, the process of scheduling a meeting is almost identical, no matter which method you used to start the process. I’ll point out the one additional step you’ll need to complete if you scheduled through the calendar in a moment. The options here are like the ones available when scheduling a meeting through Microsoft Outlook. You can set a meeting name, schedule the date and time, and add meeting details here. When scheduling a channel meeting from inside a channel, like we’re doing here, the Channel field is already populated with the channel we want to hold the meeting in. If you started scheduling the meeting from the Calendar, this field will be blank – you can click inside this field and use the pop-up list of teams and channels to select the team and channel you want to schedule the meeting in. One thing I want to point out while I'm here is the Send personal invites toggle switch that appears on the right side of the Channel field. This option sends an Outlook meeting request to all members of the team, which will show up on their calendar like any other meeting request. To ensure this meeting shows up on all team members' calendars, I’ll set the Send personal invites toggle to on. In the location field, if you’re scheduling the meeting to happen in both a physical and virtual location, you can choose the physical location here. If desired, we can change the meeting options before sending the meeting request. These options are available in the Options pane on the right side of the New meeting window. The Options pane displays by default when scheduling a meeting, but if the Options pane isn’t visible, underneath the Send button in the upper right side of the screen, click on Options. The Options pane will display. Here, we can change some basic settings about our meeting, such as who can bypass the lobby and whether recording will start automatically when the meeting is started. To view more options for the meeting, at the bottom of the list of options, click on More options. The Meeting options dialog box will display. Here, you can change the meeting’s settings as desired. When you’re done, click the Save button to save your changes. When you’re ready to send the meeting invitation, click the Send button. The scheduled meeting will now appear in the channel’s Posts tab. Additionally, if you added any required or optional attendees, or switched the toggle for Send personal invites to on, everyone invited will receive a meeting invitation in their Outlook inbox. Now, let’s talk about standard meetings. A standard meeting is one that’s held outside of a specific team, while still held inside the Microsoft Teams app. Standard meetings can be scheduled through the Calendar app in Microsoft Teams or through the calendar in Microsoft Outlook. There are benefits and drawbacks to scheduling standard meetings – let’s explore those before continuing. First, the benefits of standard meetings: Just like channel meetings, standard meetings have a persistent chat. However, the chat for standard meetings is accessible through Chats in the Microsoft Teams app. Because standard meetings aren’t attached to a team, they’re considered private meetings. This means that only the people you invite to the meeting can join the meeting and access the chat during and after the meeting. Also, delegates can schedule standard meetings, though they’ll need to do this through Outlook instead of Teams. Now let’s talk about some of the drawbacks of standard meetings. If the meeting is recorded, that recording is stored in the scheduler’s OneDrive My Files, and not in a specific team’s files. Any files shared are accessible through OneDrive, instead of through a specific channel’s Files tab. Depending on who does the sharing, the files are stored in different locations: Files that you share are in the Microsoft Teams Chat Files folder in your individual OneDrive. Files shared by others are available in the Shared view in OneDrive. Scheduling a standard meeting through the calendar is very similar to scheduling a channel meeting through the calendar. In the Calendar app in Teams, in the upper right corner of the screen, click the drop-down button to the right of the New Meeting button. Then, in the menu that appears, click on Schedule meeting. The New Meeting window appears, and the scheduling process is roughly the same here as it was for scheduling a channel meeting. The big difference is in the Channel field – for a standard meeting, you’ll leave this field empty. Other than leaving the Channel field blank, the process of scheduling a standard meeting in Microsoft Teams is the same as scheduling a channel meeting. To schedule a standard meeting in Outlook, you’ll start in Calendar view in the Outlook app. To begin scheduling a meeting, on the Home tab of the ribbon, I’ll click on Teams Meeting. A new meeting invitation window will load, and Outlook automatically adds information for joining the meeting from the Teams client on a computer or mobile device, from a video conferencing room system with teleconference equipment like a Cisco unit, or a telephone. The meeting location will also automatically be set to a Microsoft Teams Meeting. From here, you can schedule the meeting like you would any other. You can give the meeting a title, add attendees, and set the meeting’s date and time. You can also add additional information about the meeting in the message body above the connection information. To access the options available for meetings hosted in Microsoft Teams, in the new meeting window, on the ribbon in the Teams Meeting group, click on Meeting Options. The Meeting Options window will open. Here you can adjust many different settings for the meeting, such as limiting who can present, setting the meeting to record automatically, and enabling or disabling the chat. When you’re done making changes to the meeting’s options, click on the Save button to save your changes. When the changes have been saved, the Save button will change to display the text “Done!” with a checkmark next to it. You can close the Meeting Options dialog box by clicking on the Close button in the upper right corner of the window. The new meeting window is visible again. When you’re ready, click the Send button to send the meeting invitation. Once the recipient accepts the meeting, it will show up on their calendar just like a regular meeting. Now that we’ve covered channel meetings and standard meetings, let’s talk about ad hoc meetings. Ad hoc meetings are spur of the moment meetings that can be started at any time without scheduling them. These can be started either inside a channel or through a chat. To start an ad-hoc meeting in a channel, click the Meet button near the upper right corner of the screen while viewing a channel. The Meeting Settings window will open. From here, you can give the meeting a name and change your audio and video settings. When you’re ready to join the meeting, click the Join now button. The meeting window will open. A notification will also appear in the Posts tab for the channel you started the meeting in, alerting others to the meeting. Team members can click on the Join button in the notification to join the meeting. Ad hoc meetings held in a channel have the same pros and cons as a channel meeting. The chat is persistent and appears in the Posts tab of the channel, and the meeting is open to all members of the team. Additionally, any files shared during the ad-hoc meeting are stored in the channel’s Files tab, just like with a regular channel meeting. You can also start an ad-hoc meeting through a chat. While in a chat, in the upper right corner of the screen, there are buttons for starting both video and audio calls. Click on the Video call button to start a video meeting or click on the Audio call button to start an audio-only meeting. The Call window will open, and you’ll be connected to the person or people you want to meet with. Meetings started from a chat have the same pros and cons as a standard meeting. These meetings are private, meaning only the people in the chat can join the meeting, or access the chat during and after the meeting. The meeting chat is persistent, and files shared in the chat are accessible through the chat’s Files tab or through OneDrive. Now you know how to schedule various types of Microsoft Teams meetings, including channel meetings, standard meetings, and ad-hoc meetings. To learn more about how to use other parts of Microsoft Teams, check out IT Training’s Microsoft training page at ittraining.iu.edu/microsoft. [music]

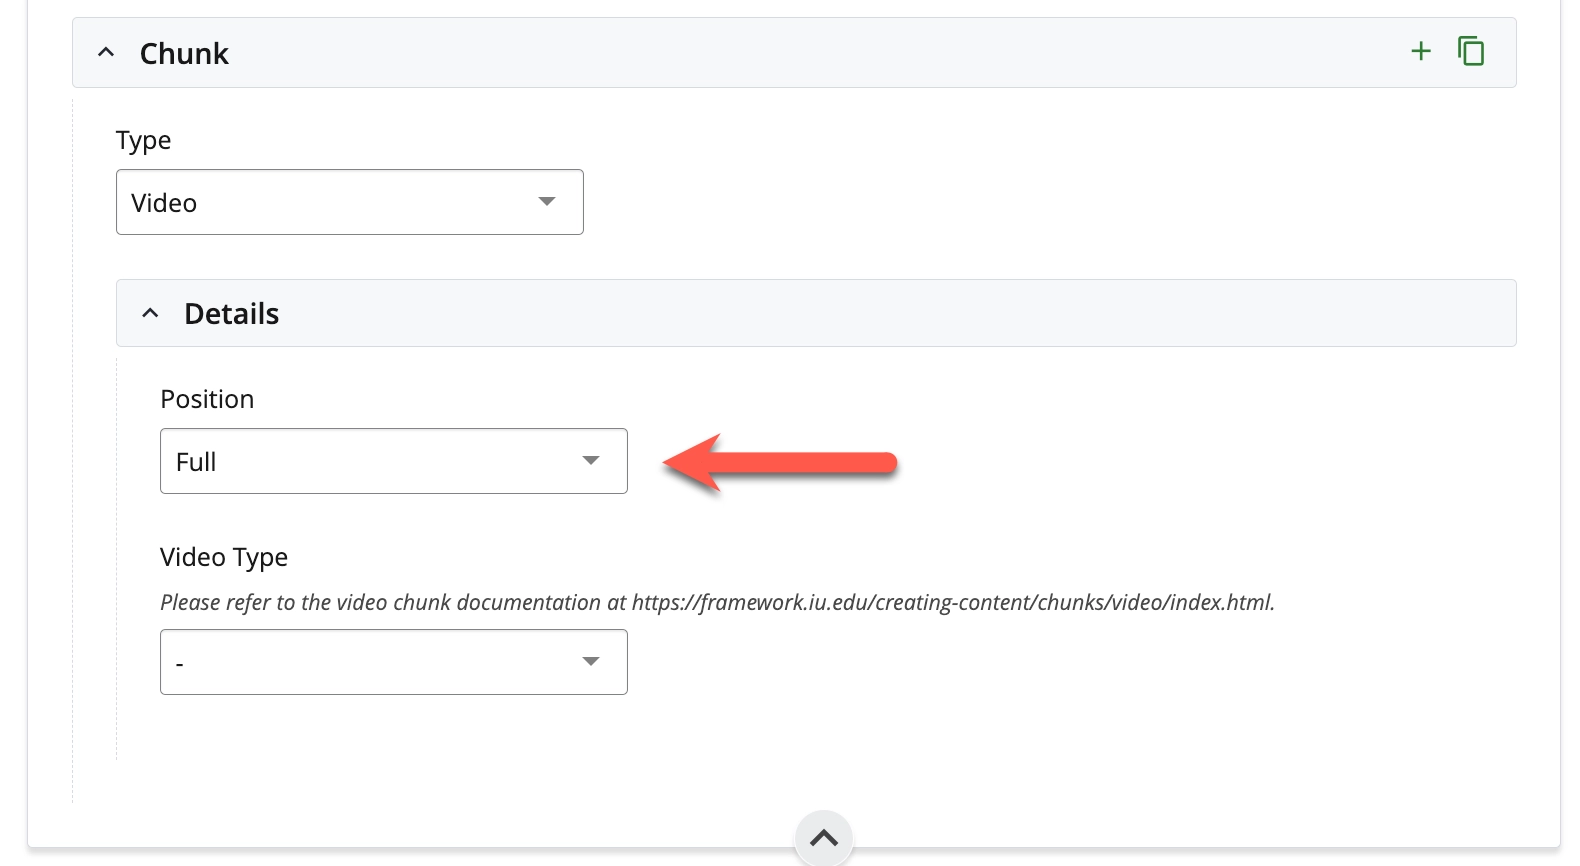
The video chunk lets you add externally hosted videos from YouTube, Vimeo, and Kaltura to your webpage.

Embedded videos are required by IU policy to have alternatives like transcripts, captions, and audio descriptions to make them accessible to more people. See the decision tree on the IU KB document Make video and audio accessible for details on what is required for accessibility.

Steps to embed a video


Step 1

While editing a page, expand Section > Chunk. In the Type dropdown, choose Video.

A screenshot of the WCMS video chunk.


Step 2

Under Section > Chunk > Details, select the Position. The video player can be positioned on the page in four ways: left, right, full, and breakout.

A screenshot of the WCMS video chunk.


Step 3

Complete the input fields and upload the necessary files. See the Input Fields section on this page for descriptions of each field.

A screenshot of the WCMS video chunk.


Step 4

Submit to save changes.

A screenshot of the WCMS video chunk.


Step 5

Confirm that updates to the page are working as expected by publishing to your test/development site (Sitehost-test).


Step 6

Once confirmed, publish the page to your live/production site (Sitehost).

Input Fields

Position
The video player can be positioned on the page in four ways: left, right, full, and breakout. The full position is the width of the column. The breakout position is the width of the page.
Video Type
The video chunk allows for four video types: YouTube, Vimeo, Kaltura, and HTML5. Learn more about Kaltura, an Indiana University enterprise video platform.
Heading Level
Able Player injects an off-screen HTML heading “Media Player” at the top of the player so screen reader users can easily find the player. It automatically assigns a heading level one level deeper than the closest parent heading. Use this field to set the heading level manually if Able Player cannot correctly set the heading level based on your page hierarchy; otherwise, do not change this field.
Closed Captions (VTT file)
Captions are text overlays that display the dialogue or narration occurring in the video, as well as relevant sounds that might be important for understanding the content. You must provide captions for all live videos and most prerecorded videos. Closed Captions must be in the VTT file format. For more information on creating a VTT file, visit the World Wide Web Consortium website.
Audio description (VTT file)
Upload and attach a VTT (Video Text Track) file. A VTT file provides closed captions and subtitles for video content. For more information on creating a VTT file, visit the World Wide Web Consortium website.
You must provide an audio description for your videos if the visual information is not included in the audio. Please refer to the IU KB document "Make video and audio accessible" for more information.
URL
The URL of the video. Do not use URLs or code intended to embed a video player onto a webpage.
URL (described version)
The URL of the described version of the video. Do not use URLs or code intended to embed a video player onto a webpage. This must be different from the id of the non-described version.
Caption
Captions are text overlays that display the dialogue or narration occurring in the video and relevant sounds that might be important for understanding the content. You must provide captions for all live videos and most prerecorded videos. Your videos if the visual information is not included in the audio. Please refer to the IU KB document "Make video and audio accessible" for more information.
Transcript
Transcripts let everyone access a text version of the video. Transcripts are also important for search engines, which can index the transcript, improving search engine optimization (SEO).